Introduction
NuXL is a novel tool for protein-RNA and DNA cross-linking studies. It is available as stand-alone-tool and as Proteome Discoverer community node. This guide outlines the steps to install NuXL, set up your analysis, and interpret your data using the provided tools and workflows.
Requirements:
- HCD data acquired on a high-resolution MS
- Developed and tested on orbitrap instruments (including Lumos, Astral)
Installation for Proteome Discoverer 3.0 and 3.1
NuXL can be installed for Proteome Discoverer 3.0 and 3.1.
-
Before Installation:
- Please make sure that Proteome Discoverer is closed before running the NuXL installer.
-
Manual Installation: For PD three .dll files need to be copied to different folders in the ‘ProteomeDiscoverer 3.1’ folder structure and a folder containing the data processing of OpenMS which needs to go to the ‘Tools’ directory. For PD 3.1 you would:
- Copy PD.OpenMS.NuXLNode.dll to C:\Program Files\Thermo\Proteome Discoverer 3.1\Proteome Discoverer 3.1\Thermo.Magellan.Server
- Copy PD.OpenMS.NuXLViewer.dll to C:\Program Files\Thermo\Proteome Discoverer 3.1\Proteome Discoverer 3.1\Thermo.Discoverer
- Copy ZedGraph_OpenMS.dll to C:\Program Files\Thermo\Proteome Discoverer 3.1\Proteome Discoverer 3.1\Thermo.Discoverer
- Go to C:\Program Files\Thermo\Proteome Discoverer 3.1\Proteome Discoverer 3.1\Tools and copy the folder “NuXL” from the .zip.
- Open PD, go to Administration -> Manage Licenses. Click “Scan for Missing Features” on top of the list of available licenses on the right side of the PD window.
-
Troubleshooting
- Sometimes the operating system blocks the execution of .dlls copied from an external source. In these cases, it is necessary to go to the folder containing the .dll, right-click on it, choose properties, and then security. The dialog offers an option to unblock the .dll from execution.
Note: Coming soon: One-click installer so no manual copy is required. The installer will automatically detect your Proteome Discoverer installation directory and deploy the NuXL nodes correctly.
Setting Up Your Study
-
Create a New Study:
- Open Proteome Discoverer
- Create a new study, define a root directory and study name (e.g., “NuXL Study”). If you set up your first NuXL study, leave ‘(empty workflow)’
-
Adding a Protein Database:
- Use the “Maintain FASTA file” option in Proteome Discoverer to add new protein databases to your project. Once configured, you can select this database in the NuXL node of the processing workflow.
Analysis Workflows
-
Generating an analysis Template:
-
Click on “New Analysis”. Note: Once completed, you will later find the analysis template in “Open Analysis Template”.
-
In the analysis window you can set up ‘processing’ and ‘consensus’ workflows for NuXL
-
Processing Workflow
- Click on Edit in the ‘Processing Step’ window
- In case you want to use a preconfigured workflow click ‘Open’ and select the template of your choice.
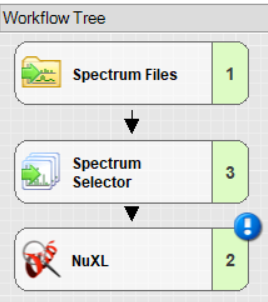
- For a minimal workflow, add and connect ‘Spectrum Files’, ‘Spectrum Selector’, and ‘NuXL’ node. Note: You will find the NuXL node under the “Sequence Database Search” category.
-
Important settings in ‘Spectrum Selector’: set “MS Order” to “Any” to ensure MS1 spectra are not discarded.
-
Configuring NuXL:
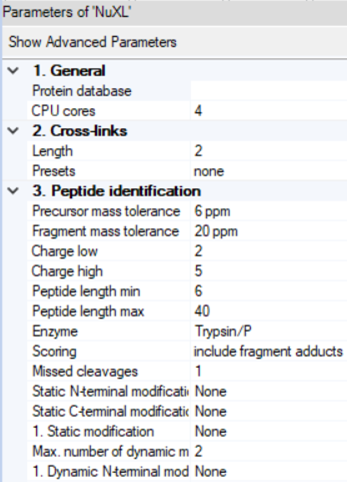
- By clicking on the NuXL processing node symbol in the workflow tree, you can adapt settings Note: If you click on “Show Advanced Parameter”, you will find additional parameters.
- NuXL provides ‘Presets’ for different crosslinking mass spectrometry protocols. For most use cases, users just need to select a preset that fits to their experimental protocol. In most cases, default parameters work reasonably well but results can sometimes be improved by tweaking some other parameters.
-
Other Parameters:
- ‘Peptide identification’ -> ‘Precursor mass tolerance’ and ‘Fragment mass tolerance’: Adjust the fragment search mass accuracy according to the used instrument.
- ‘Peptide identification’ -> ‘Static modification’ and ‘Dynamic modification’: Note: Standard fixed modification (e.g. ‘Carbamidomethyl (C)') should be specified as Dynamic if the expected amino acid can form crosslinks, as otherwise these identifications would be lost.
- ‘Cross-links’ -> ‘Length’: Depending on your nuclease digestion protocol, you might expect different lengths of nucleotide adducts. NuXL is trained and tested on nucleotide adducts of 1-4 nucleotide length. For properly RNA digested samples we recommend lowering the RNA length value to 2. In most cases, the default value works well.
- ‘Cross-links’ -> ‘Sequence’: In case your experiment involves a specific RNA or DNA species with a known sequence, it can be useful to enter the sequence in this field. The node then only considers possible nucleotide adduct combinations.
- ‘Peptide identification’ -> ‘Peptide length min’: For complex proteome searches, we recommend using 6 as minimum amino acid count. For complexes of few proteins, that would allow manual validation this can be further decreased.
- ‘Peptide identification’ -> ‘Peptide length max’: We recommend setting a limit of ~30 for complex proteome-wide searches.
- ‘Peptide identification’ -> ‘Missed cleavages’: If significant crosslinking is expected to occur and create missed cleavages, the value can be increased up to 3.
-
Advanced users:
- Users can define their own fragmentation rules and crosslink adduct settings. Select ‘none’ in ‘Presets’. You can then define ‘Fragment adducts’ and ‘Modifications’ in advanced parameters according to your protocol in the following format: [target nucleotide]:[formula] or [precursor adduct] ->[fragment adduct formula];[name]. NuXL will use this information to generate all chemically feasible precursor adduct and fragment adduct combinations.
- ‘Cross-link identification’ -> ‘Can cross-link’: In case you expect only a single or subset of nucleotides to be amenable to crosslinking, it can be useful to set this up here. Nucleotides are specified by their one-letter code without a separator (e.g. UA for U and A nucleotides)
- ‘Cross-link identification’ -> ‘Cysteine adduct’: If DTT is present during UV irradiation, it can generate additional crosslinks including a 152 Da linker. For more information see 1. If needed to be identified, we recommend specifying the composition of the linker in modifications and ‘Fragment adducts’ instead. Set this flag to true, if the 152 adduct is expected.
- ‘Cross-links’ -> ‘Target nucleotides’: Sum formulas of the target nucleotides of the crosslink. Heavy labeled atoms are specified with parenthesis in front with the nominal mass of the respective isotope (e.g. (13)C, (15)N).
-
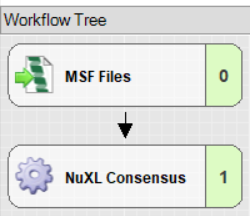
Consensus Workflow: Click on Edit in the ‘Consensus Step’ window
- Connect an ‘MSF Files’ node to the ‘NuXL Consensus’ node.
- Set “Spectra to Store” to “All” in the MSF Files node.
-
-
Running the Workflow:
- Drag and drop your Thermo Scientific .raw files onto the Processing Step in the Analysis tab
- Important: Ensure the “By File” checkbox is selected.
- Save the template
- Run the workflow

Post-Analysis
You can monitor the progress of your analysis by opening ‘Administration’ -> ‘Show Job Queue’.
- Viewing Results:
- Result files are not exported automatically. You can view your results in Proteome Discoverer, by double-clicking on a successfully finished ‘Consensus’ type result row.
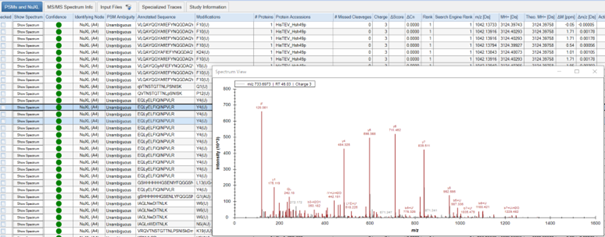
- Results are displayed in several tabs. You can choose to view: ‘Proteins’, ‘PSMs and NuXL’, ‘MS/MS Spectrum Info’, ‘Input Files’, ‘Specialized Traces’, and ‘Study Information’. Depending on your consensus workflow, you might see additional tabs.
- In the ‘PSMs and NuXL’ table, information about all peptide and crosslink spectrum matches (PSMs and NuXLs, respectively) is displayed. Key columns include ‘Annotated Sequence’, ‘Modifications’, ‘Protein Accessions’, ‘q-value’ (CSM-level q-value). We recommend to filter your results for 1% CSM-level FDR (‘q-value’ <= 0.01).
-
Exporting Data:
- To export the results for further analysis in spreadsheet software (e.g., Microsoft Excel), navigate to File -> Export -> To Microsoft Excel.
-
Quality Assessment:
- You can manually validate spectra quality by viewing annotated spectra. To do so, click on the “Show Spectrum” button in the ‘PSM and NuXL’ tab.
- Assess features such as peptide sequence coverage and the presence of key ions.
Note: For general information on Proteome Discoverer and additional nodes, please refer to the Proteome Discoverer user guide.